How to use the Timetabler module
Timetabling is one of the most involved processes in the school environment. This guide walks you through the full workflow, from initial setup to uploading your completed timetable, and includes planning tips for schools of all types.
My School > People > Learners > Learners: Timetables
Purpose
Principal integrates with Principal Timetabler, an offline stand-alone timetabling system installed on a computer at your school. By following the steps in this guide, you can simplify the process and build accurate timetables. Contact the Principal help desk if you need assistance, or visit the d6 website for online and classroom training sessions.
Timetabler workflow
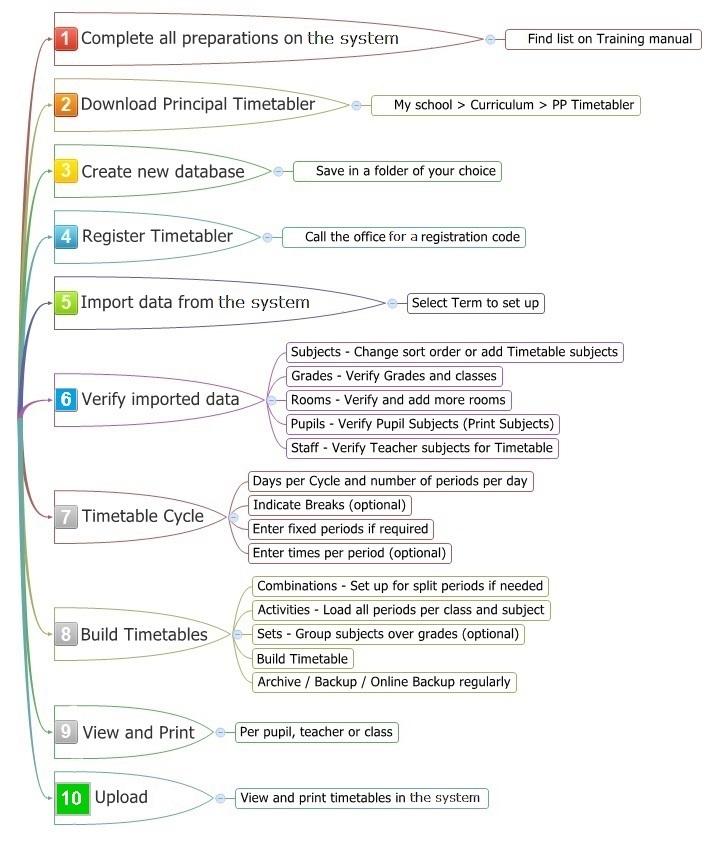
Note: To apply changes to a current timetable, repeat steps 5–10.
System setups
Different setups are needed depending on the type of timetable you are building.
Build a timetable for next year
- Set up terms for next year.
- Complete Waitlist Admissions, Re-registrations, Class Groupings and Promotions.
- Create or copy learning programmes for next year.
- Set up the learning programme for Term 1.
- Allocate learner subjects.
- Link staff classrooms and class names.
- Link subjects to teachers.
Build a new timetable in the current year
- Set up the learning programme.
- Assign subjects to teachers and learners.
- Set up register classes and class groupings.
Steps to build a timetable
Setup
- Number of days in the cycle.
- Breaks.
- Fixed periods (e.g. assembly).
- Times per period (e.g. 07:30–08:10).
Build timetables
- Combinations tab: Set up subject combinations per grade.
- Activities: Number of periods per subject per grade and class.
- Sets: Combine subjects across different grades.
- Timetable: Place periods into timetable slots.
View timetables
View per learner, class, grade or teacher.
Upload to the system
Upload completed timetables into the system. You can then view them at My School > Learners > Timetables or My School > Staff > Educator Timetables.
Tips for timetable planning
Careful planning ensures that your timetable setup runs smoothly. Consider the following:
Number of days in a cycle
Most schools use a 5-day cycle, but you may choose any number of days (e.g. 7-day, 10-day).
Number of periods per day
The number of periods per day depends on the cycle. Calculate the total: Total periods = Number of days × Number of periods per day.
Number of periods per subject
Plan the number of periods per subject, per grade and allocate teachers to subjects. Create a table in Excel similar to the example below:
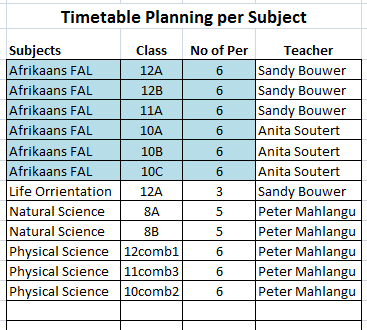
List subjects by teacher
Sort the table to print a list per teacher.
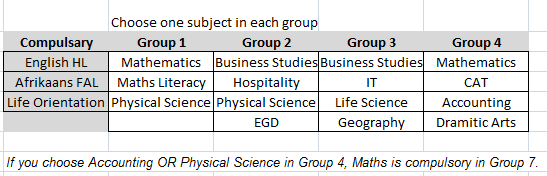
Subject combinations
Plan the subject groups per combination. Refer to the example below:
Timetable structure
Plan the layout of the timetable for each phase. Include lessons, times, assemblies, breaks, etc.
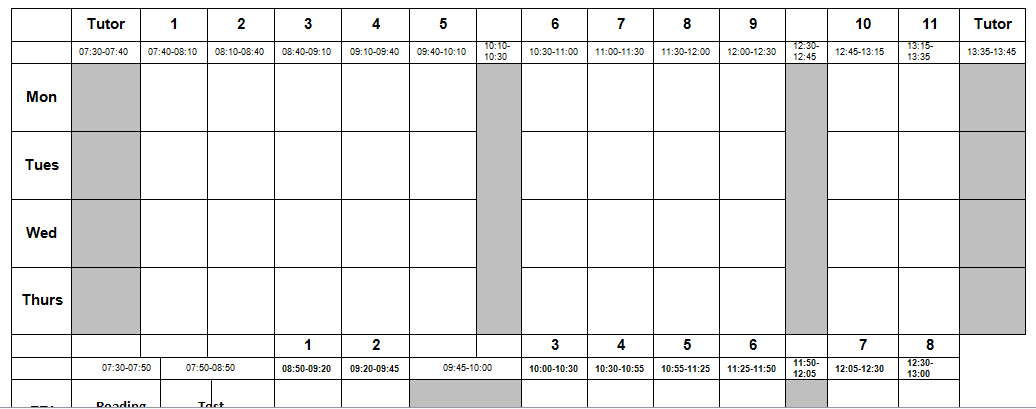
Note: The structure of the timetable dictates the number of double periods you can fit in. If you need many doubles, a structure with 3 lessons, break, 3 lessons will not be effective. Rather use an even number of periods where possible.
Schools with high schools and primary schools on one database
- Schools that have both a high school and a primary school must plan using the templates above. Often the times, number of periods and breaks differ between the two. The timetable setup must be broad enough to fit both schools' requirements.
- For example, if the high school works on a 7-day cycle and the primary school on a 5-day cycle, the timetable must accommodate the maximum number of days required (7 days). The primary school simply does not use the last two days.
- Using the templates for each phase, work out the required number of time slots per day. This must include breaks, assemblies, etc., not just lessons.
- For example, if the high school has 6 lessons on a Monday with register, two breaks and an assembly, they need 10 time slots. If the primary school has 10 lessons, register and two breaks, they need 13 time slots.
Schools with only a high school or primary school (or on separate databases)
- Do not count breaks as time slots.
- For primary schools building Foundation and Intermediate Phase timetables where times and number of periods differ, follow the combined-school instructions above.
Frequently asked questions
Are there any costs involved?
Please contact the Accounts Department regarding the fees for the Timetable module (email: sales@d6.co.za).
Can I promote learners before the final reports?
Yes. In order to build a timetable for Term 1 of the following year, learners, teachers and their subjects need to be promoted to the following year. This will not affect the pass/fail verdict for the final reports. Learners that failed will be corrected during the final step in the Admin Year-end process.
What happens if learners, subjects or teachers change during the year?
The timetable displayed in the system is not linked dynamically to the Timetabler programme.
- Make any changes to learner subjects or teachers in the system first.
- Import the system data into Timetabler, where you can adjust the timetable.
- Once complete, upload your timetable to the system again so it reflects on learners and teachers.
Last updated: March 2026 | Version 1.0
Related Articles
How to use the Timetabler module
The Timetabler module is a stand-alone tool for building school timetables. It imports data from d6+ and lets you set up and refine a timetable without affecting anything in d6+ until you are ready to upload. Once complete, the timetable is uploaded ...How to use Term Decisions
The Term Decisions module is an automated diagnostic tool used to calculate, monitor and adjust learner results for a specific term. The system evaluates marks against linked Decision Guidelines (e.g. 2012 DOE-NPPPPR) to provide a real-time status of ...How to use Learner Support
The Learner Support module is a centralised repository for documenting academic, emotional or behavioural interventions. It allows the school to maintain a chronological record of support provided to learners, ensuring continuity of care and ...How to use Final Decisions
The Final Decisions module is the central hub for year-end academic results. It aggregates data from the entire academic year to calculate a final Promotion Mark (Pass or Retain) based on linked Template or Subject-Specific Formulas, and dynamically ...How to use the Learner Overview
The Learner Overview module serves as a centralised data hub providing a comprehensive 360-degree view of a learner's school career. It consolidates biographical details, parent/guardian contact information, conduct history, academic performance, and ...